Apple Silicon: “Allow accessory to connect?” — Why Your USB-Serial Doesn’t Show Up (and How to Fix It)
Quick answer
If your USB-Serial adapter “doesn’t show up” on an Apple silicon Mac, do this:
- Unlock your Mac (stay logged in).
- Unplug and replug the adapter, then click Allow if prompted.
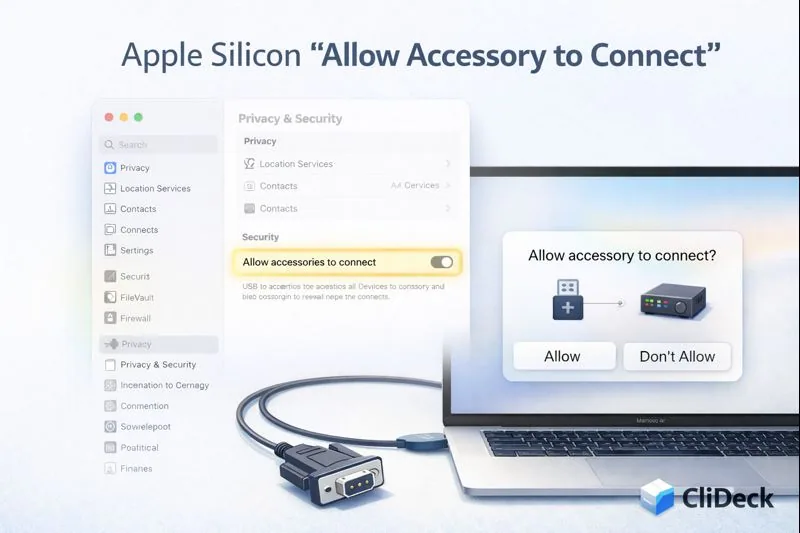
- Go to System Settings → Privacy & Security → Allow accessories to connect and choose a practical option (usually Ask for New Accessories or Automatically When Unlocked).
- Verify the port appears:
ls -1 /dev/cu.*
If you have no internet or you’re on a clean Mac with no tools installed, cu + /dev/cu.* is one of the most reliable offline ways to reach a console port. And if you want an easier workflow for multiple devices, consistent session history and logs, and browser access, that’s exactly where CliDeck fits: CliDeck Workspace.
What “Allow accessory to connect?” means (and why it blocks USB-Serial)
On Apple silicon Mac laptops, macOS includes an “accessory security” behavior for wired accessories. In practice, this means newly connected USB/Thunderbolt accessories (and sometimes peripherals connected through hubs) may require explicit approval before macOS fully enables them.
That security layer is great for preventing “drive-by” wired attacks, but it creates a very common serial-console pain:
- the adapter is physically connected,
- but the serial port never appears in
/dev/, - or it appears only after you approve the accessory.
This is usually not a driver issue and not a broken cable. It’s simply macOS waiting for permission.
Symptoms that strongly point to this issue
1) No new port appears in /dev/cu.*
Run:
ls -1 /dev/cu.*
If you don’t see anything that looks like your adapter (for example: usbserial, SLAB_USBtoUART, wchusbserial, usbmodem), keep reading.
2) You remember seeing the prompt (or you might have missed it)
The prompt can be easy to miss, especially if the Mac is locked, asleep, or you plug the adapter in while switching apps.
3) It used to work, then “stopped” after an update or reconnect
Changing macOS versions or moving through hubs/docks can cause the adapter to be treated like a “new accessory” again.
Fix in 2 minutes (step-by-step)
Step 1 — Unlock the Mac and replug the adapter
- Make sure the Mac is unlocked (not just awake).
- Unplug the USB-Serial adapter and plug it back in.
- If you see “Allow accessory to connect?”, click Allow.
Step 2 — Set a practical “Allow accessories to connect” policy
Open:
System Settings → Privacy & Security → Allow accessories to connect
Then choose an option from the table below.
Which option should you choose?
These options control how often macOS asks you to approve accessories.
| Setting | What it does | Best for |
|---|---|---|
| Ask Every Time | Prompts every time you connect an accessory | Maximum strictness; usually annoying for serial work |
| Ask for New Accessories | Prompts only when an accessory is “new” | Best balance for most people (often the default) |
| Automatically When Unlocked | Automatically allows accessories when your Mac is unlocked | Great for frequent console-cable use |
| Always | Automatically allows accessories without prompting | Most convenient; lowest friction |
Practical recommendation for USB-Serial console work:
- Start with Ask for New Accessories.
- If you connect console cables constantly, Automatically When Unlocked is often the sweet spot.
Verify it’s fixed
- Replug the adapter after changing the setting.
- Confirm the port exists:
ls -1 /dev/cu.*
- Quick “does it connect?” test using the built-in
cutool (example: 9600 baud):
cu -l /dev/cu.usbserial-XXXX -s 9600
If the port exists but the console is silent, that’s usually not accessory security anymore. Then you’re looking at the usual serial checklist: correct baud rate (often 9600 or 115200), correct wiring (RX/TX/GND), and using /dev/cu.* instead of /dev/tty.*.
If you’re working offline and just need a reliable console now, cu is still the best built-in fallback. When you want a more streamlined workflow across multiple devices with organized sessions and logs, take a look at CliDeck: CliDeck Features.
Common problems (and fast fixes)
Problem: The prompt appears, but the adapter still doesn’t show up
Try this checklist:
- Is the Mac unlocked when you plug in the adapter?
- Replug the adapter after changing the setting.
- Plug the adapter directly into the Mac (skip hubs/docks temporarily).
- Try a different USB port or cable.
- Restart the Mac if things seem “stuck” after a macOS update.
Problem: The port appears, but output is garbled
That’s almost always a baud rate mismatch. Try the two most common values:
cu -l /dev/cu.usbserial-XXXX -s 9600
cu -l /dev/cu.usbserial-XXXX -s 115200
Problem: The port appears, but nothing prints
Common causes:
- wrong baud rate,
- wrong port (use
/dev/cu.*), - device outputs only during boot,
- wiring issue (RX/TX swapped, missing ground).
Quick test: replug, connect, press Enter a few times, reboot the target device to catch boot logs.
Where CliDeck helps (and why it complements cu)
cu is perfect when you need to connect quickly and offline to a single device.
But once your workflow grows, you usually want:
- multiple devices and sessions managed in one place,
- consistent session history and logs,
- browser-first access and team-friendly workflows.
That’s exactly why we build CliDeck: CliDeck Workspace.
Bottom line
On Apple silicon Macs, a USB-Serial adapter often “doesn’t show up” because macOS is waiting for you to allow the accessory connection. Unlock the Mac, approve the prompt, and set Allow accessories to connect to a mode that matches how you work.
And when you need a smoother day-to-day workflow beyond “connect and exit,” try CliDeck: CliDeck Workspace.