Connecting to a Cisco Console on Windows 11: PuTTY Setup (COM Port, 9600 8N1, Drivers)
What you need for Cisco console access on Windows 11
Minimum essentials:
-
A Cisco console cable and a way to connect it to your PC:
- either a USB-to-RJ45 console cable,
- or an RJ45-to-DB9 console cable plus a USB-to-Serial adapter (COM port).
-
Windows 11 (sometimes you’ll need permission to install a driver).
-
PuTTY.
If you connect to many devices and you’re tired of local setup, drivers, and hunting COM ports, a browser-based workflow with session history and logs is easier to live with. That’s a core use case for CliDeck: CliDeck Workspace.
Step 1. Plug in the cable and find the COM port in Windows 11
- Plug your USB-Serial adapter or USB console cable into the computer.
- Open Device Manager.
- Expand Ports (COM & LPT).
- Note the new port name, like COM3, COM5, etc.
If Ports (COM & LPT) doesn’t appear at all, it usually means the device driver isn’t installed or the adapter isn’t recognized (see the driver section below).
If your goal is fast console access without dealing with COM ports and local tools every time, see how this workflow looks with CliDeck: CliDeck Features.
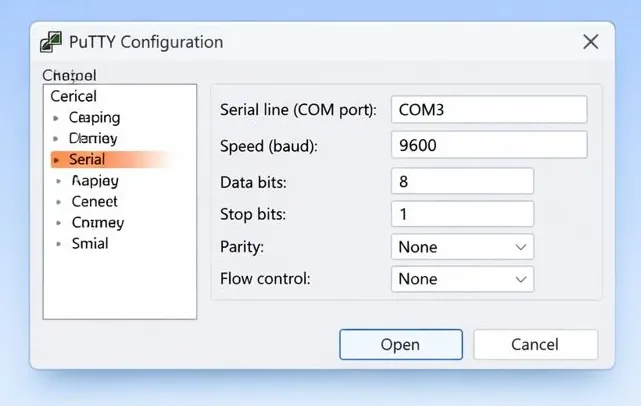
Step 2. Configure PuTTY for a Cisco console (9600 8N1)
2.1 Select Serial as the connection type
- Launch PuTTY.
- Under Connection type, select Serial.
- In Serial line, enter your COM port, for example:
COM3
2.2 Set the classic Cisco serial parameters
In Speed (baud) set:
9600
Then open the left menu: Connection → Serial and set:
- Speed (baud): 9600
- Data bits: 8
- Stop bits: 1
- Parity: None
- Flow control: None
This is the standard baseline console configuration (9600 8N1 with no flow control) used in most first-access scenarios.
If you want this to be closer to “one click” with device profiles, quick switching between sessions, and less manual setup, that’s exactly the kind of workflow CliDeck is built for: CliDeck Controllers.
Step 3. Connect and confirm the console is alive
- Click Open.
- A black terminal window opens.
- Press Enter once or twice.
What you should see:
- a device prompt (for example
Switch>orRouter>), - or boot messages if the device is rebooting.
If nothing appears, jump to the troubleshooting checklist below.
Step 4. Drivers on Windows 11: what to do if no COM port appears
4.1 The easy case: Windows installs it automatically
Often Windows 11 installs a suitable driver on its own. Wait 10–30 seconds after plugging in, then check Ports (COM & LPT) again.
4.2 The device shows up, but not as a COM port
In Device Manager, check:
- Other devices (often with a warning icon),
- or Universal Serial Bus controllers.
Then:
- Right-click the device → Update driver.
- Choose automatic driver search.
4.3 Common USB-Serial chip families
Many console adapters use popular USB-Serial chip families that require a correct driver:
- FTDI
- Prolific
- Silicon Labs (CP210x)
- WCH (CH340/CH9102)
If the COM port still doesn’t appear, try another USB port, another cable/adapter, and make sure you’re using an actual console cable (not a standard Ethernet patch cable).
If you want to avoid the entire “which chip / which driver / which COM port” routine and keep consoles, history, and logs in one place, this is exactly the pain CliDeck targets: CliDeck Downloads.
Step 5. Troubleshooting checklist (the stuff that really fixes it)
5.1 The COM port exists, but PuTTY shows a blank screen
Check in this order:
- Press Enter a few times.
- Confirm you selected the correct COMx.
- Re-check settings: 9600 / 8 / N / 1 / None (Flow control must be None).
- If you have multiple COM ports, try the other candidate.
- Unplug/replug the USB cable and reopen the session.
5.2 Garbled characters (“junk text”)
This is almost always a baud rate or flow control mismatch.
- Set the speed back to 9600.
- Set Flow control to None.
- Some devices use 115200, but for Cisco console the safe first guess is 9600.
5.3 “Unable to open serial port”
Usually caused by:
- the port is already in use (IDE, another PuTTY, a serial monitor),
- the COM port is wrong or doesn’t exist,
- permissions/policy restrictions.
Fix:
- close anything that might be using the COM port,
- confirm the COM port in Device Manager,
- try running PuTTY as Administrator (as a diagnostic step).
5.4 Cable is plugged into the wrong port on the device
Cisco “console” is not Ethernet. Make sure you’re plugged into the Console port (RJ-45 console or USB console, if the model has one).
Step 6. Why we still recommend PuTTY (and where CliDeck is easier)
PuTTY is a classic tool: lightweight, stable, and perfect for “right now” console access on Windows—especially when you’re offline and just need local connectivity.
But in real work, you quickly run into things PuTTY doesn’t provide as one cohesive workflow:
- One workspace for many devices (instead of juggling windows and configs).
- Session history and logs so output isn’t lost.
- Browser access and a smoother cross-OS workflow.
That’s the direction CliDeck is built around: CliDeck Comparison and CliDeck Workspace.
Summary
To connect to a Cisco console on Windows 11 using PuTTY:
- Find the COM port in Device Manager → Ports (COM & LPT).
- In PuTTY, choose Serial and enter
COMx. - Set 9600 8N1, Parity None, Flow control None.
- Click Open and press Enter to get a prompt.
- If no COM port appears, fix driver/recognition first.
And if you want console access to feel less like “configure it every time” and more like a managed workspace with history and logs, take a look at CliDeck: CliDeck Features.