Serial Console Runbook for First-Time Rack Access
Serial Console Runbook for First-Time Rack Access
Short answer
When you access a rack device over serial console for the first time, do not start by typing commands randomly. First confirm the device, cable path, console settings, terminal behavior, and current state. Then capture a clean baseline before making any changes.
A safe first-time rack access flow looks like this:
- Identify the exact device and console port.
- Confirm the correct cable, adapter, and serial settings.
- Open the console session and verify readable output.
- Confirm hostname, model, role, and current mode.
- Capture the initial state before changing anything.
- Document what you found.
- Make changes only after you know where you are and what state the device is in.
This runbook is written for engineers, technicians, makers, and small infrastructure teams who need a calm, repeatable way to approach a device at the rack.
Why first-time rack access needs a runbook
First-time console access is easy to underestimate. The work often looks simple: plug in a console cable, open a terminal, press Enter, and start typing.
In real racks, it is not always that clean.
You may be dealing with:
- Similar devices stacked close together
- Unlabeled console ports
- Incorrect patching
- Wrong baud rate
- A USB-serial adapter that changed port names
- A device stuck in bootloader or recovery mode
- A live production system
- A previous engineer’s unfinished change
- A remote person telling you what to check while you are physically at the rack
The goal of this runbook is to prevent the two biggest mistakes:
- Working on the wrong device
- Changing something before capturing the current state
Console access gives you powerful low-level access. Treat it carefully.
Before going to the rack
Before touching anything, collect the basic assignment details.
You should know:
- Site or room
- Rack number
- Device hostname
- Device role
- Device model if known
- Asset tag or serial number if available
- Expected console type
- Who requested the work
- Whether the device is production, lab, staging, or unknown
- Whether you are only observing or allowed to make changes
A simple pre-rack note:
Target device: edge-sw-03
Site: Chicago lab
Rack: R12
Role: access switch for test bench
Access needed: serial console only
Task: confirm boot status and capture prompt
Change approval: no changes approved yet
If you do not know whether changes are approved, assume they are not.
Tools to bring
For first-time rack access, bring more than one path to success.
Useful items:
- Laptop or tablet
- USB-serial adapter
- Known-good console cable
- USB-C or USB-A adapters as needed
- Short Ethernet patch cable if the console path uses RJ45-style rollover wiring
- Phone or camera for rack labels and cabling photos
- Small flashlight
- Label tape or temporary tags if allowed
- Notes app, ticket, or runbook workspace
- Charger or battery pack
If your workflow uses CliDeck, this is also where a browser-based workspace can help keep terminal access, notes, and runbook steps close together. The same discipline still applies if you are using a traditional terminal application.
Step 1: Confirm the physical device
At the rack, do not trust position alone. Verify the device using multiple clues.
Check:
- Rack unit location
- Front-panel label
- Asset tag
- Serial number sticker
- Port labels
- Cable labels
- Device model
- Status LEDs
- Any documentation in the ticket or runbook
If the rack has multiple identical devices, take extra care. “Second switch from the top” is not a reliable identifier.
A good note:
Physical check:
Rack R12, U18.
Front label says edge-sw-03.
Asset tag matches ticket.
Model matches expected device type.
Console cable connected to the device labeled edge-sw-03.
If the label does not match the ticket, stop and clarify before continuing.
Step 2: Confirm the console cable path
Before opening a terminal session, understand how the cable reaches the device.
Common console paths include:
- Direct USB-serial adapter to RJ45 console cable
- USB console port directly into the device
- Rack console server
- Portable console device
- Out-of-band controller
- Serial adapter connected through another workstation
Document the path:
Console path:
Laptop USB-C -> USB-serial adapter -> RJ45 console cable -> edge-sw-03 console port
Or:
Console path:
Browser workspace -> remote console controller -> port 4 -> edge-sw-03
This matters later if another engineer needs to reproduce your access.
Step 3: Use safe default serial settings
Many network devices use a serial console profile like 9600 baud, 8 data bits, no parity, 1 stop bit, and no flow control. But not every device does.
A common starting point is:
Speed: 9600
Data bits: 8
Parity: none
Stop bits: 1
Flow control: none
If the output is unreadable, do not assume the device is broken. Try the likely serial settings for that platform.
Common signs of wrong serial settings:
- Random characters
- Repeating symbols
- Partially readable words
- Output changes when you press keys but remains garbled
- Login prompt appears as unreadable text
If you need a deeper explanation of baud rate and 8N1 problems, CliDeck already has a related guide: Garbage Characters in Serial Console: Baud Rate & 8N1 Explained
Step 4: Open the console session carefully
After connecting the cable and choosing the settings, open the console session.
Do not immediately paste commands. First press Enter once and observe.
You are looking for:
- Login prompt
- Device prompt
- Boot messages
- Bootloader prompt
- Recovery shell
- Password prompt
- Blank screen
- Garbled output
- Repeating errors
Write down exactly what you see.
Examples:
Observed:
Device shows login prompt.
No boot loop visible.
Prompt is readable at 9600 8N1.
Or:
Observed:
Output is garbled at 9600.
Need to test alternate baud rates before continuing.
Or:
Observed:
Device is at bootloader prompt.
No normal OS prompt yet.
No commands entered.
This prevents confusion later.
Step 5: Do not interrupt boot unless that is the task
If the device is booting, wait and observe unless your assignment specifically says to interrupt boot.
Interrupting boot can be useful for recovery work, but it can also stop a device from returning to service.
Do not press:
- Break
- Ctrl+C
- Ctrl+L
- Escape
- Space
- Mode button
- Reset button
unless you know that is the intended action.
If your task is specifically to interrupt boot on Cisco equipment, use a dedicated procedure. CliDeck has a separate guide for that workflow: Cisco Console: How to Reliably Interrupt Boot and Enter ROMMON or the Bootloader
For normal first-time access, your job is usually to observe, identify, and capture state.
Step 6: Confirm where you are
Once you have a readable prompt, confirm the system identity before doing anything else.
For network equipment, useful checks may include:
show version
show running-config | include hostname
show inventory
show clock
For Linux-based systems or appliances:
hostname
hostname -f
uptime
date
whoami
pwd
For devices where commands vary by vendor, use the safest identification command available.
You want to confirm:
- Hostname
- Model
- Software version
- Current time
- Current privilege level or mode
- Whether you are in normal OS mode, configuration mode, bootloader, recovery mode, or shell
Write a short state note:
Confirmed:
Hostname: edge-sw-03
Mode: privileged EXEC
Software: normal OS booted
Time: device clock appears correct
No configuration mode entered
Step 7: Capture a baseline
Before making changes, collect a baseline. This is especially important when you are the first person to touch the device physically.
For network devices:
show clock
show users
show version
show interfaces status
show ip interface brief
show logging | last 50
For switching work:
show vlan brief
show interfaces trunk
show spanning-tree summary
For routing work:
show ip route
show arp
show lldp neighbors
show cdp neighbors
For Linux or appliance shell access:
uptime
ip addr show
ip route
systemctl --failed
journalctl -p warning --since "30 minutes ago"
Do not run destructive or broad commands as part of the baseline. The baseline should observe, not change.
Step 8: Record current risk
Before any change, write down what could go wrong.
Examples:
Risk:
Device appears to be production.
No changes approved yet.
Console access works, but SSH state is unknown.
Or:
Risk:
Device is in bootloader prompt.
Normal OS is not running.
Do not reboot or change boot variables until recovery plan is confirmed.
Or:
Risk:
Multiple similar switches in this rack.
Confirmed label once, but second engineer should verify before changes.
A risk note does not need to be long. It needs to be clear enough to stop a bad assumption.
Step 9: If remote engineers are involved, create a handoff note
First-time rack access often happens with one person at the rack and another person remote.
Use a simple handoff format:
RACK ACCESS NOTE

Technician:
Remote engineer:
Site / rack:
Device label:
Console path:
Serial settings:
Current prompt:
Confirmed hostname:
Current mode:
Commands run:
Changes made:
Risks:
Next step:
Example:
RACK ACCESS NOTE

Technician: Sam
Remote engineer: Priya
Site / rack: Chicago lab, R12
Device label: edge-sw-03
Console path: laptop -> USB-serial -> RJ45 console
Serial settings: 9600 8N1, no flow control
Current prompt: edge-sw-03#
Confirmed hostname: edge-sw-03
Current mode: privileged EXEC
Commands run: show version, show clock, show users
Changes made: none
Risks: production role not fully confirmed
Next step: wait for remote engineer approval before diagnostics continue
This is much better than saying “I’m in.”
For a deeper handoff workflow, see Command Handoffs: How to Pass Terminal Work to Another Engineer Safely
Step 10: Be careful with copy and paste
Console sessions can behave differently from normal SSH terminals. Pasting too much text can cause missed characters, command overlap, or accidental execution.
Use these habits:
- Paste one command at a time.
- Wait for the prompt to return.
- Avoid pasting configuration blocks until you know the console is stable.
- Do not paste secrets into shared logs.
- Watch for line wrapping.
- Confirm the command echoed correctly before pressing Enter if the terminal does not auto-submit.
- Avoid pasting commands from unknown sources without reading them.
If the console is slow or unstable, type manually or paste shorter lines.
Step 11: Know when to stop
Stop and ask for clarification if:
- The device label does not match the ticket.
- The prompt shows an unexpected hostname.
- The device is in bootloader or recovery mode.
- The output is unreadable.
- You see crash logs or repeated boot failure.
- You are asked to make a change without approval.
- The device appears to be production but the task says lab.
- The console path might be connected to the wrong port.
- You are not sure whether a command is safe.
A good stop note:
Stopping here:
Ticket says edge-sw-03, but console prompt shows edge-sw-04.
No changes made.
Need confirmation before continuing.
Stopping early is not failure. It is how you prevent a bigger incident.
First-time rack access checklist
Use this checklist when you are physically at the rack.
[ ] Confirm site, rack, and device label.
[ ] Confirm asset tag or serial number if available.
[ ] Confirm console cable path.
[ ] Confirm serial settings.
[ ] Open console session.
[ ] Press Enter once and observe.
[ ] Confirm readable output.
[ ] Confirm hostname or device identity.
[ ] Confirm current mode or shell user.
[ ] Capture baseline output.
[ ] Document commands already run.
[ ] Document that no changes were made, if true.
[ ] Identify risks or mismatches.
[ ] Ask for approval before making changes.
Troubleshooting common first-access problems
No output at all
If the terminal shows nothing:
- Confirm the cable is in the console port, not an Ethernet data port.
- Confirm the USB-serial adapter is detected.
- Confirm the correct serial port name or COM port.
- Try pressing Enter once.
- Try a known-good console cable.
- Confirm the device has power.
- Try another USB port or adapter.
- Check whether the device uses a USB console port instead of RJ45 serial.
On macOS, CliDeck has related guides for finding and using serial devices:
- Connecting to Serial Console Ports on macOS with the screen Utility
- macOS Serial Port Names Explained: /dev/cu.* vs /dev/tty.*
Output is garbled
If output is garbled:
- Check baud rate.
- Confirm 8N1.
- Disable flow control.
- Try common alternate speeds for that device family.
- Confirm the adapter and cable are known-good.
Do not proceed until the output is readable.
Keyboard input does not work
If you can see output but cannot type:
- Confirm the terminal session is connected to the correct serial port.
- Check flow control.
- Try pressing Enter.
- Try another terminal tool or browser serial workspace.
- Check the cable.
- Confirm the device is not stuck in a state that ignores input.
The device is in bootloader or recovery mode
If the device is not in the normal operating system:
- Do not reboot repeatedly.
- Do not change boot variables unless that is the approved task.
- Capture the prompt and any error messages.
- Document the state.
- Escalate or follow the approved recovery runbook.
The hostname is not what you expected
If the hostname does not match the ticket:
- Stop.
- Do not make changes.
- Capture the prompt and physical label.
- Recheck the cable path.
- Ask for confirmation.
This is one of the most important safety rules in rack work.
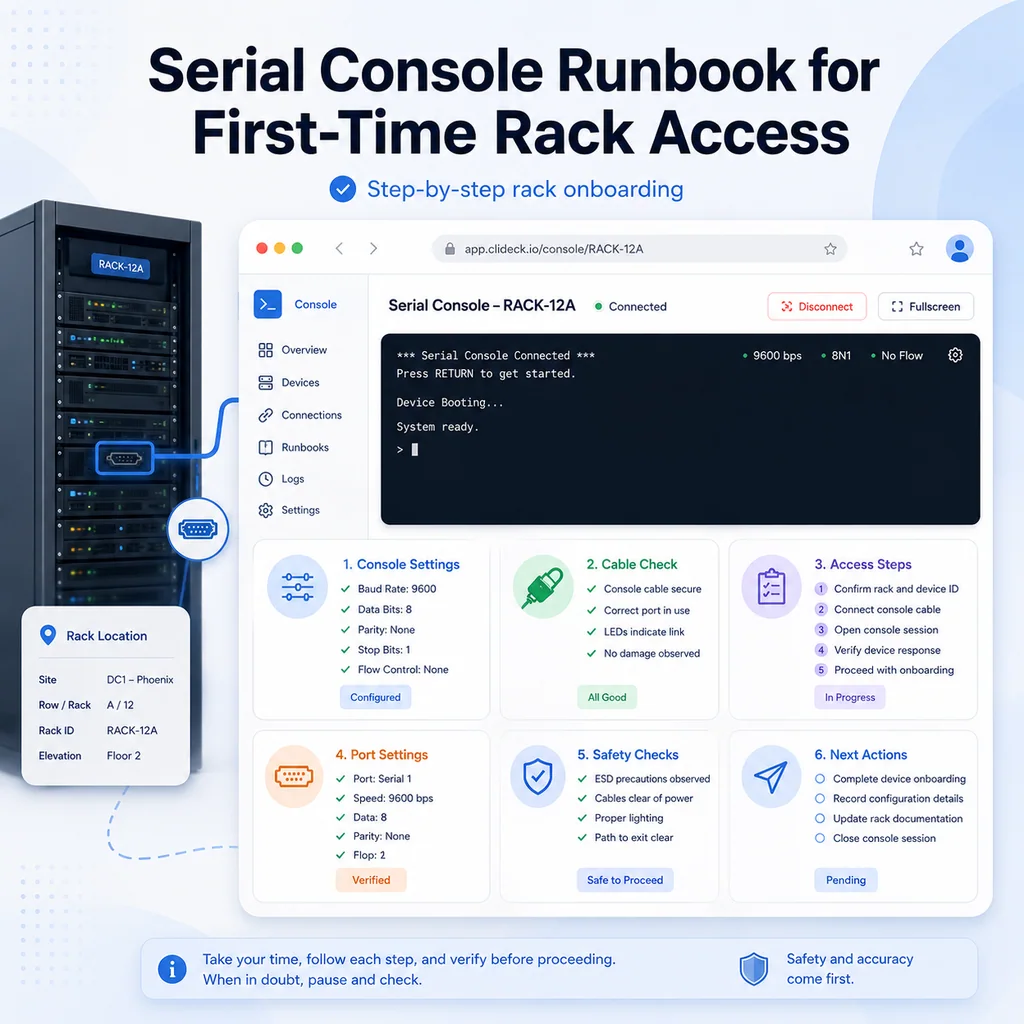
Where CliDeck fits
CliDeck is a browser-based workspace for SSH, serial console, runbooks, shared terminal workflows, controller management, and remote operations.
For first-time rack access, the key value is keeping the workflow organized: terminal session, notes, device context, and handoff details should stay close together. That helps both the person at the rack and the remote engineer understand what has been checked and what should happen next.
Do not treat the tool as a substitute for operational discipline. Whether you use CliDeck, a local terminal app, or a traditional console cable, the safe workflow is the same: identify first, observe second, change last.
Final thought
First-time rack access is not just a cabling task. It is the point where physical reality, documentation, and live system state meet.
The safest approach is slow at the beginning and efficient later: confirm the device, confirm the console path, capture the baseline, and document what you see. Once you know exactly where you are, the rest of the work becomes much safer.