How to Find Your Serial Port Name on macOS, Linux, and Windows
How to Find Your Serial Port Name on macOS, Linux, and Windows
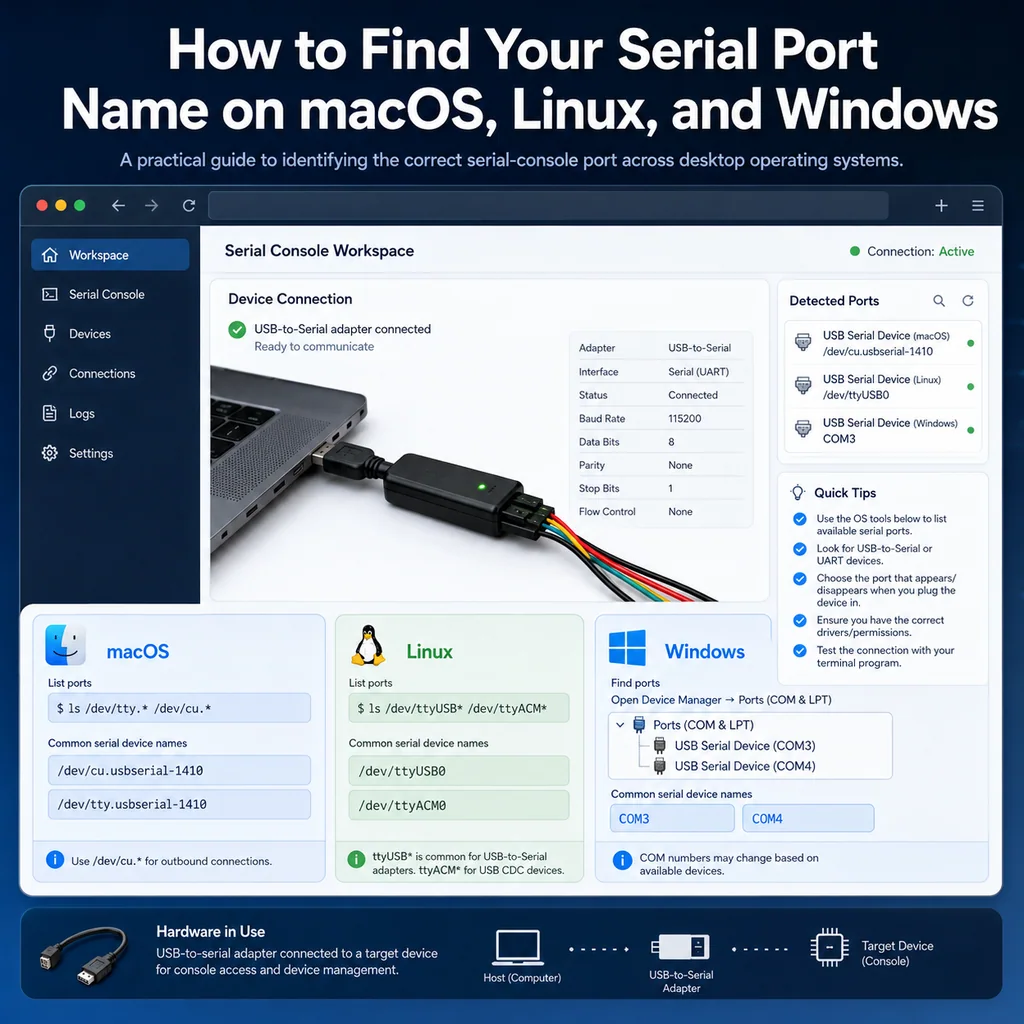
Before you can open a serial console session, you need the correct serial port name.
On macOS, it usually looks like /dev/cu.usbserial-* or /dev/cu.usbmodem*.
On Linux, it usually looks like /dev/ttyUSB0, /dev/ttyACM0, or another /dev/tty* device.
On Windows, it usually looks like COM3, COM4, or another COM port number.
The fastest way to find it is to plug in your USB-Serial adapter, check which new device appeared, and then use that port name in your terminal application.
Why the serial port name matters
A serial console connection needs three basic things:
- The correct port name.
- The correct baud rate.
- The correct line settings.
For many network devices, the common default is:
9600 8N1
That means:
Speed: 9600 baud
Data bits: 8
Parity: none
Stop bits: 1
Flow control: usually none
But even if your baud rate is correct, the session will not open if you choose the wrong port.
That is why the first troubleshooting step is simple: identify the serial device your operating system created when you plugged in the adapter.
Quick answer
Use this table as the starting point.
| System | Common port name | Where to look |
|---|---|---|
| macOS | /dev/cu.usbserial-*, /dev/cu.usbmodem* | Terminal: ls /dev/cu.* |
| Linux | /dev/ttyUSB0, /dev/ttyACM0 | Terminal: dmesg, ls /dev/ttyUSB* /dev/ttyACM* |
| Windows | COM3, COM4, etc. | Device Manager → Ports (COM & LPT) |
If you are using CliDeck for browser-based serial console work, you still need to select the correct adapter or serial device when the browser asks for access.
Related reading: https://clideck.com/blog/how-to-connect-to-equipment-over-usb-directly-from-your-browser
How to find the serial port on macOS
On macOS, USB-Serial adapters usually appear under /dev/.
For console work, prefer /dev/cu.* instead of /dev/tty.*.
Step 1: unplug the adapter
First, unplug the USB-Serial adapter.
Then run:
ls /dev/cu.*
You may see built-in Bluetooth or system devices. That is normal.
Step 2: plug the adapter back in
Now plug in the USB-Serial adapter and run the same command again:
ls /dev/cu.*
Look for the new device that appeared.
Common examples:
 /dev/cu.usbserial-110
 /dev/cu.usbserial-A50285BI
 /dev/cu.usbmodem14101
 /dev/cu.SLAB_USBtoUART
 /dev/cu.usbserial
That new /dev/cu.* device is usually the one you want.
Step 3: use the port in your serial tool
With screen, the command may look like:
screen /dev/cu.usbserial-110 9600
With cu, it may look like:
cu -l /dev/cu.usbserial-110 -s 9600
Why /dev/cu.* is usually better than /dev/tty.*
On macOS, the same adapter may appear twice:
 /dev/cu.usbserial-110
 /dev/tty.usbserial-110
For outbound console connections, /dev/cu.* is usually the better choice. It is the device most people want when connecting to switches, routers, firewalls, server serial ports, and lab equipment.
Related reading: https://clideck.com/blog/macos-serial-port-names-explained-dev-cu-vs-tty-and-which-one-to-use
macOS troubleshooting
The port does not appear
If no new /dev/cu.* device appears after plugging in the adapter, check:
- The USB cable.
- The adapter.
- The USB hub or dock.
- macOS accessory permission prompts.
- Whether the adapter needs a driver.
- Whether the adapter appears in System Information.
On Apple Silicon Macs, macOS may ask whether to allow the accessory to connect. If the adapter does not appear at all, check that prompt or the related system setting.
Related reading: https://clideck.com/blog/apple-silicon-allow-accessory-to-connect-why-your-usb-serial-doesn-t-show-up-and-how-to-fix-it
The port appears but will not open
If the port exists but your terminal tool cannot open it, another process may already be using it.
Check for active screen sessions:
screen -ls
You can also check which process is holding the port:
lsof | grep /dev/cu.usbserial
Replace /dev/cu.usbserial with part of your real port name.
Related reading: https://clideck.com/blog/macos-serial-port-busy-find-what-s-holding-dev-cu-and-free-it
screen immediately exits
If you see:
[screen is terminating]
Common causes include:
- Wrong device path.
- Device already in use.
- Adapter unplugged.
- Driver problem.
- Permission or lock issue.
- Using
/dev/tty.*instead of/dev/cu.*.
Related reading: https://clideck.com/blog/fixing-screen-is-terminating-on-macos-a-checklist-that-actually-works
How to find the serial port on Linux
On Linux, USB-Serial adapters often appear as:
 /dev/ttyUSB0
 /dev/ttyUSB1
 /dev/ttyACM0
 /dev/ttyACM1
The exact name depends on the adapter chipset and driver.
Step 1: unplug the adapter
Unplug the USB-Serial adapter.
Then run:
ls /dev/ttyUSB* /dev/ttyACM* 2>/dev/null
It is fine if this returns nothing.
Step 2: plug the adapter back in
Plug in the adapter and run:
ls /dev/ttyUSB* /dev/ttyACM* 2>/dev/null
The new device is probably your serial adapter.
Examples:
 /dev/ttyUSB0
 /dev/ttyACM0
Step 3: check kernel messages
For more detail, run:
dmesg | tail -50
You may see lines showing the USB adapter and the device name assigned to it.
For example:
usb 1-1: FTDI USB Serial Device converter now attached to ttyUSB0
That means your port is:
/dev/ttyUSB0
Step 4: use the port in your serial tool
With screen:
screen /dev/ttyUSB0 9600
With picocom:
picocom -b 9600 /dev/ttyUSB0
With minicom, you can configure the serial device as:
/dev/ttyUSB0
Linux troubleshooting
Permission denied
If Linux shows a permission error, your user may not have access to the serial device.
Check the device permissions:
ls -l /dev/ttyUSB0
You may see a group such as dialout.
On many Debian/Ubuntu-based systems, you can add your user to the dialout group:
sudo usermod -aG dialout "$USER"
Then log out and log back in.
Do not just keep using sudo forever unless that is truly required by your environment. It is better to fix the permission model.
The device number changes
Sometimes the same adapter appears as /dev/ttyUSB0 one time and /dev/ttyUSB1 another time.
This can happen when:
- Multiple adapters are connected.
- A previous session did not close cleanly.
- The adapter was unplugged and replugged.
- The system assigned the next available number.
For a quick manual workflow, just re-check the port before connecting.
For a more permanent setup, Linux can use persistent device names under /dev/serial/by-id/.
Try:
ls -l /dev/serial/by-id/
You may see a stable name that points to the current /dev/ttyUSB* device.
Example:
usb-FTDI_FT232R_USB_UART_A50285BI-if00-port0 -> ../../ttyUSB0
That stable path can be safer for scripts and repeatable lab setups.
Nothing appears under /dev/ttyUSB*
Try checking all recent USB messages:
dmesg | tail -100
Also check USB devices:
lsusb
If the adapter appears in lsusb but no serial port appears, it may need a driver, or the kernel may not be binding it as a serial device.
How to find the serial port on Windows
On Windows, serial devices appear as COM ports.
Examples:
COM3
COM4
COM7
COM12
Step 1: open Device Manager
Right-click the Start button and open:
Device Manager
Then expand:
Ports (COM & LPT)
Step 2: plug in the adapter
Unplug the USB-Serial adapter, then plug it back in.
Watch for a new device under Ports (COM & LPT).
It may look like:
USB Serial Port (COM3)
Silicon Labs CP210x USB to UART Bridge (COM4)
USB-SERIAL CH340 (COM5)
Prolific USB-to-Serial Comm Port (COM6)
The part in parentheses is the port name.
For example:
COM4
Step 3: use that COM port in your terminal app
In PuTTY:
Connection type: Serial
Serial line: COM4
Speed: 9600
Then open the session.
Related reading: https://clideck.com/blog/connecting-to-a-cisco-console-on-windows-11-putty-setup-com-port-9600-8n1-drivers
Windows troubleshooting
Ports section is missing
If you do not see Ports (COM & LPT), Windows may not currently detect any serial devices.
Try:
- Replugging the adapter.
- Trying another USB port.
- Trying another USB cable.
- Opening Device Manager after the adapter is connected.
- Checking for unknown devices.
- Installing the correct driver for the adapter chipset.
Common USB-Serial chipsets include FTDI, CP210x, CH340, and Prolific.
Related reading: https://clideck.com/blog/windows-finding-the-right-com-port-for-usb-serial-ftdi-cp210x-ch340-driver-sanity-checks
The COM number is high
A high COM number, such as COM12 or COM18, is not automatically a problem.
Most modern terminal apps can use it normally.
If your tool has trouble with high COM numbers, check whether it supports the port format directly or whether it needs special handling. In most normal PuTTY-style workflows, choosing the displayed COM port is enough.
The port changes after replugging
Windows may assign a different COM number if:
- You use a different USB port.
- You use a different adapter.
- The driver creates a new device instance.
- Old COM assignments remain stored.
For a stable bench setup, try using the same adapter in the same USB port.
How to confirm you found the right port
Finding a port name is not always enough. You also want to confirm that it is connected to the expected device.
Press Enter
After opening the serial session, press Enter once or twice.
You may see a prompt such as:
Switch>
Router>
login:
Username:
If nothing appears, the device may still be booting, the cable may be wrong, or the serial settings may be wrong.
Power-cycle or reboot the device
If appropriate for your environment, rebooting or power-cycling the connected device can confirm that you are watching the correct console output.
You may see boot messages immediately.
Do this only when it is safe. Do not power-cycle production equipment casually.
Check the cable path
For rack or lab work, confirm the physical path:
Laptop -> USB-Serial adapter -> console cable -> device console port
Wrong-cable mistakes are common. A valid serial port on your laptop does not guarantee it is connected to the device you think it is.
Related reading: https://clideck.com/blog/how-to-avoid-working-on-the-wrong-server-or-network-device
If the session opens but the text is unreadable
If the terminal opens but shows random symbols or garbage characters, the port name may be correct but the serial settings are wrong.
The most common cause is a baud rate mismatch.
Try common speeds:
9600
19200
38400
57600
115200
For many network devices, 9600 8N1 is the first setting to try. Some devices use 115200.
Related reading: https://clideck.com/blog/garbage-characters-in-serial-console-baud-rate-8n1-explained-with-quick-tests
If the session opens but you cannot type
If you see output but your input does not work, check:
- Flow control settings.
- Cable type.
- Whether the device is still booting.
- Whether the console is waiting for a special key.
- Whether your terminal app has local echo disabled.
- Whether another session is also connected.
For most network console sessions, hardware flow control should usually be disabled unless the device specifically requires it.
Serial port names by platform
macOS examples
 /dev/cu.usbserial-110
 /dev/cu.usbserial-A50285BI
 /dev/cu.usbmodem14101
 /dev/cu.SLAB_USBtoUART
Use:
ls /dev/cu.*
Linux examples
 /dev/ttyUSB0
 /dev/ttyUSB1
 /dev/ttyACM0
 /dev/serial/by-id/usb-FTDI_FT232R_USB_UART_A50285BI-if00-port0
Use:
ls /dev/ttyUSB* /dev/ttyACM* 2>/dev/null
dmesg | tail -50
ls -l /dev/serial/by-id/ 2>/dev/null
Windows examples
COM3
COM4
COM7
COM12
Use:
Device Manager -> Ports (COM & LPT)
A simple workflow that works almost every time
Use this process when you are not sure which port is correct.
macOS
ls /dev/cu.*
# plug in the adapter
ls /dev/cu.*
screen /dev/cu.YOUR_DEVICE_NAME 9600
Linux
ls /dev/ttyUSB* /dev/ttyACM* 2>/dev/null
# plug in the adapter
ls /dev/ttyUSB* /dev/ttyACM* 2>/dev/null
dmesg | tail -50
screen /dev/ttyUSB0 9600
Windows
1. Open Device Manager.
2. Expand Ports (COM & LPT).
3. Plug in the adapter.
4. Note the new COM port.
5. Open PuTTY.
6. Select Serial.
7. Enter the COM port and speed.
Practical checklist before starting real console work
Before you begin a real serial console session, confirm:
Port name: confirmed
Baud rate: confirmed or best known default
Line settings: 8N1
Flow control: off unless required
Device identity: confirmed
Session logging: enabled if needed
Recovery plan: understood before risky changes
For important work, also capture the device name, rack location, cable path, and reason for access. That makes the session easier to review later.
Related reading: https://clideck.com/blog/serial-console-runbook-for-first-time-rack-access
Final answer
To find your serial port name, plug in the USB-Serial adapter and look for the new device your operating system creates.
On macOS, check:
ls /dev/cu.*
On Linux, check:
ls /dev/ttyUSB* /dev/ttyACM* 2>/dev/null
dmesg | tail -50
On Windows, check:
Device Manager -> Ports (COM & LPT)
Once you have the port name, use it with the correct serial settings. For many network devices, start with 9600 8N1. If the session opens but the output is unreadable, try another baud rate. If the port does not appear at all, troubleshoot the cable, adapter, driver, permissions, or operating system access prompt.